

Edible Pine Cones
Edible Pine Cones are a delightful and whimsical treat that bring a bit of nature’s charm right to your table! This playful recipe features creamy peanut butter, rich Nutella, and a crunchy pretzel twist, all transformed into a sweet and unique forest-inspired dessert. The delightful combination of textures and flavors results in a treat that’s hard to resist—perfect for parties, family gatherings, or just a cozy night in. Plus, with this step-by-step recipe, making these fun edible pine cones is easier than you might think!
Sure to be a hit with kids and adults alike, Edible Pine Cones not only taste good but also look stunning on any dessert table. They evoke nostalgia, creativity, and a sense of playfulness while satisfying your sweet tooth. If you’re looking for a fun and interactive dessert idea that sparks joy and invites laughter, this is it!
Why You’ll Love This Recipe
This Edible Pine Cone recipe is a must-try for several reasons. Firstly, it involves easy prep and requires minimal ingredients, making it an accessible choice for bakers of all skill levels. If you’re short on time but want to impress, these charming treats can be made in a snap!
Moreover, this recipe is incredibly family-friendly. Kids will love getting involved in the creation process, and it’s a fantastic way to bond over something delicious. The use of pretzels adds a delightful crunch, while the sweet mixtures of peanut butter and Nutella keep everyone’s tastebuds dancing.
Lastly, there’s an element of creativity in how each pine cone can turn out slightly different, allowing you to personalize your treats. It’s a dessert that supports creativity and enthusiasm, making it perfect for gatherings, themed parties, or even classroom celebrations.
Ingredients for Edible Pine Cones
To create your own Edible Pine Cones, you will need the following ingredients:
- 2/3 cup creamy peanut butter—smooth, rich, and nutty.
- 1/3 cup Nutella—chocolatey bliss that perfectly complements the peanut butter.
- 4 tablespoons unsalted butter, softened—adds creaminess to the mixture.
- 1 teaspoon pure vanilla extract—just a dash for warmth and depth.
- 1 1/2 cups confectioners’ sugar, as well as more for dusting—this adds sweetness and a touch of elegance.
- 8 salted pretzel twists—crunchy and salty, about 2 1/2" long, perfect for the “pine cones.”
- 1 box of Chocolate Frosted Flakes (13.7 oz)—to create the "scales" of the pine cones.
All these ingredients combine to form a playfully delicious and visually appealing dessert that everyone will enjoy!
Step-by-Step Directions for Edible Pine Cones
In the large bowl of a stand mixer fitted with the paddle attachment, beat together the creamy peanut butter, Nutella, softened butter, and vanilla extract on medium-high speed until the mixture is smooth and well blended.
Gradually add the confectioners’ sugar, about 1/4 cup at a time, mixing until a putty-like dough forms. The dough should be thick and easy to mold.
Once the dough is ready, transfer it to a clean work surface and divide it into 8 equal pieces.
Take one pretzel twist in your hand, and start molding the dough around it. Begin wider at the base of the pretzel and taper it as you move up—this motion creates the conical shape.
Arrange each coated pretzel on a parchment-lined baking sheet, ensuring the wide end is facing down. Repeat this step with all the remaining dough and pretzels.
Next, take your Chocolate Frosted Flakes and starting at the bottom of each pine cone, press in one cereal piece at a time at a slight angle, working your way up in a spiral until the entire cone is covered.
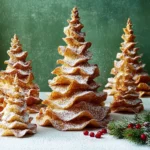
For the finishing touch, dust your edible pine cones with confectioners’ sugar to mimic freshly fallen snow, enhancing their visual appeal and adding a touch of sweetness.
Tips & Tricks
Here are some chef’s secrets and optional extras to elevate your Edible Pine Cone creations.
- Enhance the flavor by using different nut butters, such as almond or cashew butter, for exciting taste variations.
- For an even richer chocolate flavor, you could mix in cocoa powder into your dough.
- If you want to explore different shapes, consider molding the dough into acorns or other fun designs to play with creativity.
- Make sure your mixing bowl and utensils are clean and dry for the best outcomes in consistency.
- Don’t hesitate to incorporate edible glitter or colored sprinkles for a more festive look!
Serving Suggestions & Pairings
Presentation is key when it comes to these delightful Edible Pine Cones! These treats can be beautifully showcased on a rustic wooden platter, combined with fresh fruits like strawberries and blueberries to add color and flavor contrast. They also pair wonderfully with hot cocoa for cozy gatherings or as a fun part of a nature-themed party.
For a creative spin, consider serving them alongside a selection of nuts and dried fruits to enhance the outdoor forest vibe. They’re perfect for holidays, camping-themed parties, or even a whimsical dessert bar at birthdays!
Nutritional Information
While indulging in these Edible Pine Cones, keep in mind that they are a treat meant for special occasions. Each treat contains a delicious mix of carbohydrates, fats, and sugars. Although the exact caloric count will depend on your specific measurements, it’s safe to say a single pine cone delight can contain around 150-200 calories.
While they make for an excellent sweet treat, moderation is key, especially if you wish to savor these delightful morsels without guilt. Pair with fresh fruit or other snacks that offer balanced nutrition for a well-rounded dessert experience.
Storing Tips & Variations for Edible Pine Cones
If you find yourself with leftover Edible Pine Cones (which is unlikely!), they can be stored in an airtight container in the refrigerator for up to a week. Just keep in mind that the pretzels may lose their crunch over time.
For healthier swaps, consider using dark chocolate or a powdered sugar alternative. You could also experiment with different toppings, such as shredded coconut for a snowy effect or crushed nuts for extra crunch!
To change things up, try creating a caramel version by using caramel spread instead of Nutella, or add a sprinkle of cinnamon for a different flavor experience. The variations are endless!
Conclusion for Edible Pine Cones
Don’t wait any longer to experience the joy of Edible Pine Cones! This fun and delicious recipe is a highlight at any gathering, combining easy preparation with delightful flavors and visuals. Whether as party treats or a bit of kitchen fun with your family, these edible creations promise to enchant everyone who lays eyes on them and takes a bite.
Gather your ingredients and dive into the delightful world of Edible Pine Cones today—you won’t regret it!
FAQs
1. Can I use crunchy peanut butter instead of creamy?
Yes, using crunchy peanut butter can add more texture to your Edible Pine Cones, creating a unique mouthfeel!
2. How long do these treats last?
Edible Pine Cones can last in the refrigerator for up to a week if stored properly in an airtight container.
3. Can I make these ahead of time?
Absolutely! These treats can be prepared a day or two in advance, making them perfect for parties and gatherings.
4. What can I use instead of Nutella?
If you want a nut-free option, consider using chocolate hazelnut spread alternatives or even a chocolate frosting for a similar taste.
5. Can the pretzel twists be replaced with something else?
If pretzels aren’t your style, try using breadsticks or even large marshmallows for a fun, different look while keeping the same flavor profile!
Edible Pine Cones
Ingredients
Method
- In a large bowl of a stand mixer fitted with the paddle attachment, beat together the creamy peanut butter, Nutella, softened butter, and vanilla extract on medium-high speed until the mixture is smooth and well blended.
- Gradually add the confectioners' sugar, about 1/4 cup at a time, mixing until a putty-like dough forms.
- Transfer the dough to a clean work surface and divide it into 8 equal pieces.
- Take one pretzel twist and start molding the dough around it, beginning wider at the base and tapering up to create a conical shape.
- Arrange each coated pretzel on a parchment-lined baking sheet with the wide end facing down.
- Repeat this step with all remaining dough and pretzels.
- Press in Chocolate Frosted Flakes at a slight angle starting at the bottom of each pine cone, spiraling up until covered.
- Dust with confectioners' sugar to mimic freshly fallen snow before serving.
