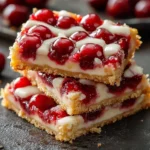
Christmas Cherry Bars Classic
Christmas Cherry Bars Classic is the quintessential festive treat that brings warmth and sweet joy to any holiday gathering. These delightful bars blend a buttery, soft base with the tangy sweetness of cherry pie filling, creating a flavor experience that dances on your taste buds. As you bite through the tender layers, you’ll be greeted with a burst of fruity goodness encased in a rich, chewy bar that’s drizzled with a smooth vanilla glaze. This recipe is easy to prepare and perfect for sharing, making it a must-have for your holiday dessert table.
Why spend hours in the kitchen when you can whip up Christmas Cherry Bars Classic in no time? This step-by-step recipe is designed for bakers of all levels, requiring simple ingredients and straightforward instructions. You’ll find that every bite of these cherry bars is not just about pleasure but also about creating cherished memories with loved ones during the festive season.
Why You’ll Love This Recipe
If you’re looking for a holiday treat that combines ease and delight, Christmas Cherry Bars Classic is your best bet. Here’s why you’ll adore this recipe:
- Easy Prep: With only a handful of ingredients, preparing these bars is a breeze, allowing you to spend more time celebrating.
- Family-Friendly: Kids and adults alike will love the vibrant flavor of cherries paired with a rich, buttery base. It’s a treat the whole family can enjoy.
- Quick To Make: This recipe comes together rapidly, which means you can bake a batch even on the busiest of days leading up to the holidays.
- Minimal Ingredients: You won’t need to go overboard shopping for exotic ingredients—most of what you need is likely already in your pantry!
Ingredients for Christmas Cherry Bars Classic
To make Christmas Cherry Bars Classic, you’ll need the following delightful ingredients:
- 1 cup (226 grams) unsalted butter, softened: This gives the bars a rich, decadent flavor and contributes to the soft texture.
- 2 cups (400 grams) granulated sugar: Sweetness is key, and this will make your bars irresistibly enjoyable.
- 4 large eggs: Eggs add moisture and act as a binding agent to create a lovely structure in your bars.
- 1 teaspoon pure vanilla extract: A hallmark of holiday baking, vanilla adds warmth and depth to the flavor profile.
- 3 cups (360 grams) all-purpose flour: The backbone of your bars, providing the necessary structure and chewiness.
- 1 teaspoon fine salt: A pinch of salt enhances all the flavors and balances the sweetness.
- 1 can (21 ounces or 595 grams) cherry pie filling: This is the star of the show, bringing a burst of fruitiness that defines these bars.
- 1 cup (120 grams) powdered sugar: Used for glazing, it adds a touch of sweetness on top.
- 2 tablespoons (30 milliliters) whole milk: This will thin out the glaze for a perfect drizzle.
- 1/2 teaspoon pure vanilla extract (for glazing): Just a hint to keep that delicious vanilla essence in play.
Step-by-Step Directions
Creating Christmas Cherry Bars Classic is straightforward with this easy-to-follow guide. Here’s how to make them:
Preheat the oven to 350°F (175°C) and lightly grease a 9×13-inch (23×33 cm) baking pan.
In a large mixing bowl, beat the softened butter and granulated sugar together until pale and fluffy (about 3 to 5 minutes). You want to achieve a light, airy consistency to ensure your bars are soft.
Add eggs one at a time, mixing thoroughly after each addition. Blend in the vanilla extract until combined.
In a separate bowl, whisk together the flour and salt, then gradually add to the butter mixture, stirring until just combined. Be careful not to overmix; this keeps your bars tender.
Spread approximately 3 cups of the batter into the bottom of the greased pan, creating an even layer to serve as the base.
Distribute the cherry pie filling evenly over the batter. Don’t be shy; the cherries bring most of the flavor!
Drop small portions of the remaining batter over the cherry filling, leaving some of the filling exposed. This creates a lovely marbled look.
Bake for 35-40 minutes until golden brown and a toothpick inserted in the center comes out clean. Your kitchen will be filled with the delightful aroma of baking!
Allow to cool in the pan on a wire rack. Cooling is essential for consistency.
For the glaze, whisk powdered sugar, milk, and the additional vanilla extract until smooth. Drizzle generously over the cooled bars once they have reached room temperature.
Cut into desired sizes and serve at room temperature for an optimal experience!
Tips & Tricks
Here are some chef’s secrets and handy tips to elevate your baking game:
- Use high-quality ingredients: The better the butter and vanilla, the richer your bars will taste.
- Experiment with flavors: Consider adding almond extract alongside vanilla for an extra punch or topping with chopped nuts for a delightful crunch.
- Chill the butter: If you forget to soften the butter, grate it instead! This will quickly blend into the sugar.
- Don’t skip the glaze: A drizzle of glaze not only looks impressive but adds sweetness and enhances the overall flavor of the bars.
- Check for doneness carefully: Every oven is different; keep an eye on the bars as they bake to avoid overcooking.
Serving Suggestions & Pairings
These Christmas Cherry Bars Classic are delightful on their own, but you can elevate the presentation and satisfaction with these ideas:
- Serve with a dollop of whipped cream on top for added richness.
- Pair with a scoop of vanilla ice cream; the warm bars vs. cold ice cream creates a delicious contrast.
- Accompany with a hot beverage, like spiced tea or rich hot chocolate, to warm up those chilly holiday evenings.
- Garnish with fresh cherries or mint leaves for a pop of color and freshness on your dessert plate.
Nutritional Information
While these bars are a celebration of indulgence, knowing the nutritional information can help you manage the sweet treats during the festivities. Each serving (assuming you cut them into 12 pieces) contains approximately:
- Calories: 280
- Total Fat: 14g
- Saturated Fat: 8g
- Cholesterol: 60mg
- Sodium: 180mg
- Total Carbohydrates: 39g
- Sugars: 24g
Remember, it’s the holiday season! Enjoying these bars as a treat is part of the celebration.
Storing Tips & Variations for Christmas Cherry Bars Classic
To enjoy your Christmas Cherry Bars Classic beyond the initial serving, consider these storage tips and variations:
Freezing: These bars freeze well! Cut them into individual pieces and store them in an airtight container, layered between wax paper, for up to three months. Simply thaw at room temperature before serving.
Reheating: If you enjoy them warm, just pop them in the microwave for a few seconds before devouring.
Healthier swaps: Consider using coconut oil in place of butter for dairy-free bars or substitute half of the granulated sugar with a sugar alternative.
Creative variations: Swap out cherry pie filling for raspberry or blueberry for a delightful twist on the classic, or sprinkle some chocolate chips for a double treat.
Conclusion for Christmas Cherry Bars Classic
With their buttery base, fruity filling, and creamy glaze, Christmas Cherry Bars Classic are not only a feast for the eyes but also a staple that shouldn’t be missed during the holiday season. This recipe encapsulates the spirit of celebration and comfort. It’s time to gather your ingredients and dive into creating these irresistible bars that will wow your guests and spread joy all around. Make your home festive with the aroma of baking and the sweet satisfaction of sharing delicious treats—try making these bars today!
FAQs
1. Can I make these bars ahead of time?
Absolutely! You can bake these bars a day or two in advance. Just store them in an airtight container at room temperature.
2. Can I use fresh cherries instead of pie filling?
While fresh cherries can be used, you’ll need to sweeten them and cook them down slightly to mimic the consistency of pie filling.
3. How do I know when the bars are done baking?
Insert a toothpick in the center; if it comes out clean or with a few moist crumbs, they’re ready.
4. Can I add nuts to the recipe?
Yes! Chopped walnuts or pecans can be sprinkled over the cherry filling for added texture and flavor.
5. What’s the best way to cut the bars?
To achieve clean cuts, allow the bars to cool completely, and use a sharp knife. Wipe the knife clean between cuts for the best results.
Christmas Cherry Bars Classic
Ingredients
Method
- Preheat the oven to 350°F (175°C) and lightly grease a 9x13-inch (23x33 cm) baking pan.
- In a large mixing bowl, beat the softened butter and granulated sugar together until pale and fluffy (3 to 5 minutes).
- Add eggs one at a time, mixing thoroughly after each addition. Blend in the vanilla extract until combined.
- In a separate bowl, whisk together the flour and salt, then gradually add to the butter mixture, stirring until just combined.
- Spread approximately 3 cups of the batter into the bottom of the greased pan to create an even layer.
- Distribute the cherry pie filling evenly over the batter.
- Drop small portions of the remaining batter over the cherry filling, leaving some filling exposed.
- Bake for 35-40 minutes until golden brown and a toothpick inserted in the center comes out clean.
- Allow to cool in the pan on a wire rack.
- Whisk powdered sugar, milk, and additional vanilla extract until smooth. Drizzle generously over the cooled bars.
- Cut into desired sizes and serve at room temperature.