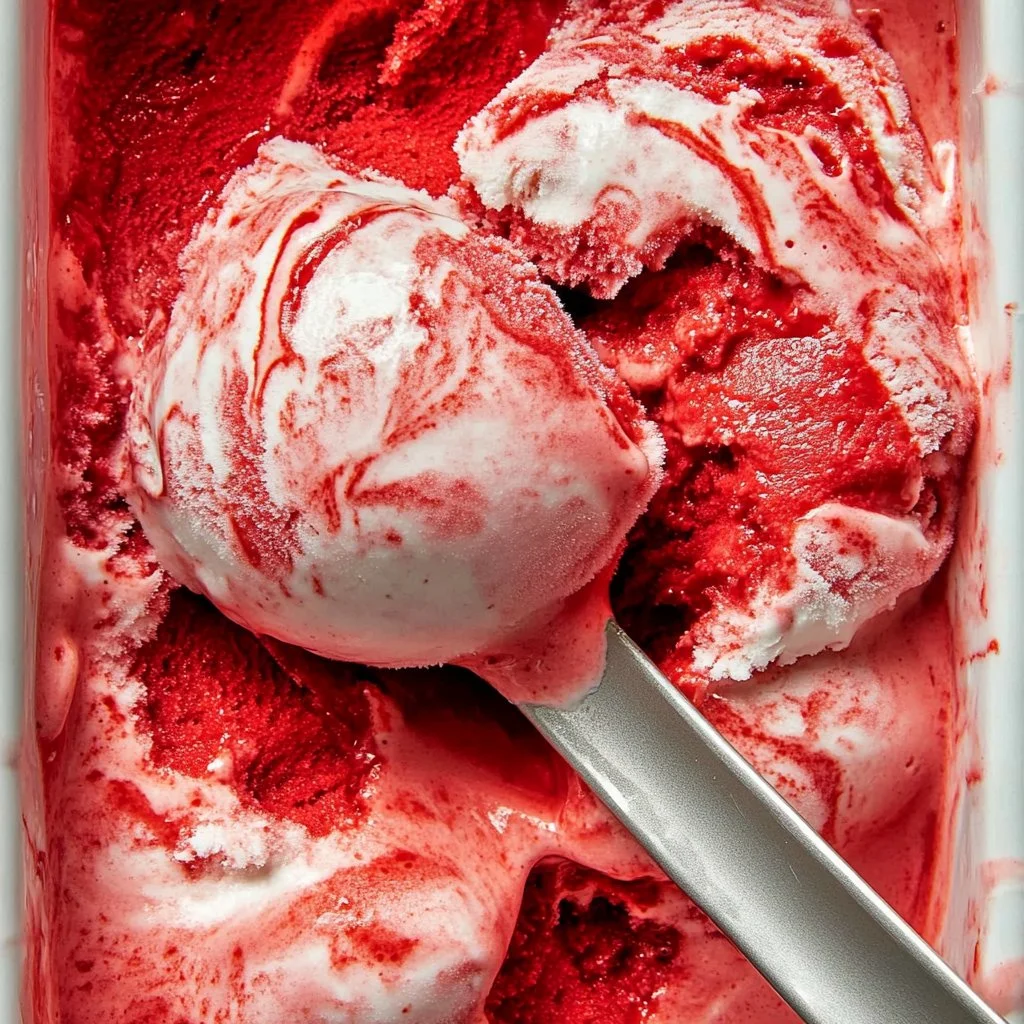
Red Velvet Ice Cream
Indulging in a creamy, luscious scoop of Red Velvet Ice Cream is a delightful experience that combines the nostalgic flavors of a classic red velvet cake with the enchanting coldness of ice cream. This recipe offers a step-by-step guide that pulls you into the kitchen, allowing your senses to dance with the vibrant hues of red, the rich aroma of chocolate, and the smooth texture that beckons your taste buds. Imagine the first bite—velvety richness embracing your palate while hints of creamy vanilla and subtle cocoa swirl around, creating a sensation that brings joy and indulgence to any occasion.
History / Fun Fact
The delightful marriage of flavors in Red Velvet Ice Cream stems from a beloved Southern classic: red velvet cake. This iconic cake emerged in the early 20th century, becoming a staple of celebration and Southern hospitality. Its rich red color, attributed to cocoa powder and sometimes a hint of beet juice, symbolizes love and decadence. As culinary creativity blossomed, bakers soon began transforming this classic cake recipe into an equally irresistible ice cream. Today, Red Velvet Ice Cream allows sweet lovers to enjoy the tastes of the iconic dessert in a fresh, frosty form.
Ingredients
- 2 cups heavy cream: This rich, creamy base sets the stage for indulgence, offering a texture that feels luxurious and smooth.
- 1 cup buttermilk: With its tangy note, buttermilk adds depth and a subtle sharpness that balances the sweetness.
- 1 cup granulated sugar: The sparkling granules dissolve into the mixture, sweetening it to perfection.
- 1/4 cup Dutch process cocoa powder: Dark and rich, this cocoa lends a profound chocolatey flavor that elevates the experience.
- 2 tsp. pure vanilla extract: Aromatic and inviting, vanilla enhances the overall flavor profile, ensuring each bite is fragrant and welcoming.
- 1/2 tsp. kosher salt: Just a touch brings harmony, enhancing sweetness and drawing out the hidden flavors.
- Red food coloring: A few drops create an eye-catching visual that enhances the experience, lending that signature vibrant red hue.
- 6 oz. cream cheese, softened: Cream cheese adds a creamy tang and provides the iconic flavor resembling classic cake frosting.
- 3/4 cup powdered sugar: This light, airy sugar helps create the dreamy cheesecake frosting that perfectly swirls into the ice cream.
- 2 cups crumbled red velvet cake: The star of the show, these tender cake pieces offer richness and texture that turn creamy ice cream into a full-fledged dessert.
Cooking Time & Tips For Red Velvet Ice Cream
When making Red Velvet Ice Cream, the preparation time can vary. A quick version can have you enjoying this sweet treat within a few hours, while allowing the mixture to chill overnight enhances the flavors, making it an even more delightful experience. For the best results, use high-quality ingredients—especially the cream and cocoa powder—as they make a significant difference in taste. It is also vital to ensure everything is adequately chilled before churning to achieve the perfect creamy texture.
Step-by-Step Directions
In a large mixing bowl, whisk together heavy cream, buttermilk, granulated sugar, Dutch cocoa powder, vanilla extract, and kosher salt. Watch the ingredients blend into a smooth, velvety mixture that entices you to dip your finger and taste.
Add red food coloring a few drops at a time, mixing thoroughly until you reach your desired shade of crimson. The vibrant color will dance in the bowl, reflecting the anticipation for indulgence.
Cover the bowl with plastic wrap and refrigerate the mixture until well chilled, ideally for at least one hour or up to three days. Allowing this step ensures all flavors meld beautifully.
While the ice cream base chills, prepare your ice cream maker according to the manufacturer’s instructions. This will ensure a smooth churn process that leaves you with an airy texture.
In a separate medium bowl, beat together softened cream cheese and powdered sugar until smooth and creamy. The aroma of sweetened cream cheese wafts up, promising a delightful frosting that will swirl into your ice cream.
Once your ice cream base is thoroughly chilled, stir it into the bowl of the ice cream maker. Churn the mixture until creamy and smooth, taking a moment to appreciate the transformation from liquid to luscious ice cream.
Spread one-third of the ice cream into a loaf pan, then dollop one-third of the cream cheese mixture over the ice cream. Gently swirl it in with a spatula, creating an inviting marbled effect. Next, sprinkle with one-third of the crumbled red velvet cake.
Repeat the layering process two more times, finishing with a final layer of ice cream sprinkled with cake crumbs on top. Watch as the colors capture the essence of love and celebration.
Cover the pan with plastic wrap and freeze it until solid, ideally for a minimum of six hours or up to one month. The anticipation builds as you await the moment you can savor your creation.
Serving Suggestions & Occasions
Red Velvet Ice Cream is the perfect treat for many occasions—birthdays, anniversaries, or simply an indulgent evening at home. Serve it in beautiful bowls garnished with whipped cream, chocolate shavings, or a sprinkle of crushed nuts for added texture. Consider drizzling it with a velvety cream cheese glaze for an extra touch of decadence. Pair it with a slice of classic red velvet cake to create a dessert that’s sure to impress your guests.
Common Mistakes For Red Velvet Ice Cream
While making Red Velvet Ice Cream is relatively straightforward, a few common mistakes can lead to less than desired results. One frequent error is not chilling the mixture adequately before churning; ensure it’s well-chilled to achieve the right texture. Over-churning can also occur, so watch the consistency closely. Finally, using low-quality ingredients will compromise the flavor, making the ice cream less enjoyable than it could be.
Healthier Alternatives & Variations
For those looking for healthier options, consider using low-fat cream or alternative milk to lighten the base. Greek yogurt could replace some heavy cream, adding protein and a tangy flavor. You can also omit or reduce the sugar for a less sweet treat. For variations, get creative—try adding a swirl of raspberry or strawberry puree for a fruity touch, or mix in some mini chocolate chips for an added crunch. Experimenting can lead to delightful, personalized versions of this beloved ice cream.
FAQs
Can I use store-bought red velvet cake for this recipe?
Yes, using store-bought red velvet cake can save time and simplify the process, yet homemade cake enhances flavor and freshness.How long can I store the ice cream?
Red Velvet Ice Cream can be stored in the freezer for up to one month for optimal freshness, though the taste is best enjoyed within the first week.Can I make this recipe without an ice cream maker?
Absolutely! Pour the mixed ingredients into a shallow dish and freeze, stirring every 30 minutes until creamy.Is Red Velvet Ice Cream suitable for gluten-free diets?
If you use gluten-free cake, this recipe can easily be adapted for gluten-sensitive individuals.Can I change the flavor of the cake?
Yes, feel free to swap the red velvet cake for any favorite flavor such as chocolate or vanilla for a different twist.What can I serve with Red Velvet Ice Cream?
Pair it with chocolate sauce, fresh berries, or even a slice of red velvet cake for an extra indulgent treat.
Conclusion
What are you waiting for? Gather your ingredients and embark on the aromatic, visually stunning journey of crafting your own Red Velvet Ice Cream today. Every scoop will transport you to a place of blissful indulgence, proving that with just a bit of time and love in the kitchen, a delightful dessert is only a few steps away. Don’t resist the temptation—let the vibrant color and rich flavor capture your heart and taste buds!
Red Velvet Ice Cream
Ingredients
Method
- In a large mixing bowl, whisk together heavy cream, buttermilk, granulated sugar, Dutch cocoa powder, vanilla extract, and kosher salt until smooth.
- Add red food coloring a few drops at a time, mixing thoroughly until desired shade is achieved.
- Cover the bowl with plastic wrap and refrigerate until well chilled, ideally for at least one hour or up to three days.
- Prepare your ice cream maker according to the manufacturer’s instructions.
- In a separate medium bowl, beat together softened cream cheese and powdered sugar until smooth.
- Once ice cream base is chilled, stir it into the ice cream maker and churn until creamy and smooth.
- Spread one-third of the ice cream into a loaf pan, then dollop one-third of the cream cheese mixture on top. Swirl gently with a spatula.
- Sprinkle one-third of the crumbled red velvet cake over the cream cheese mixture. Repeat this process two more times, finishing with a layer of ice cream topped with cake crumbs.
- Cover the pan with plastic wrap and freeze until solid, ideally for a minimum of six hours or up to one month.