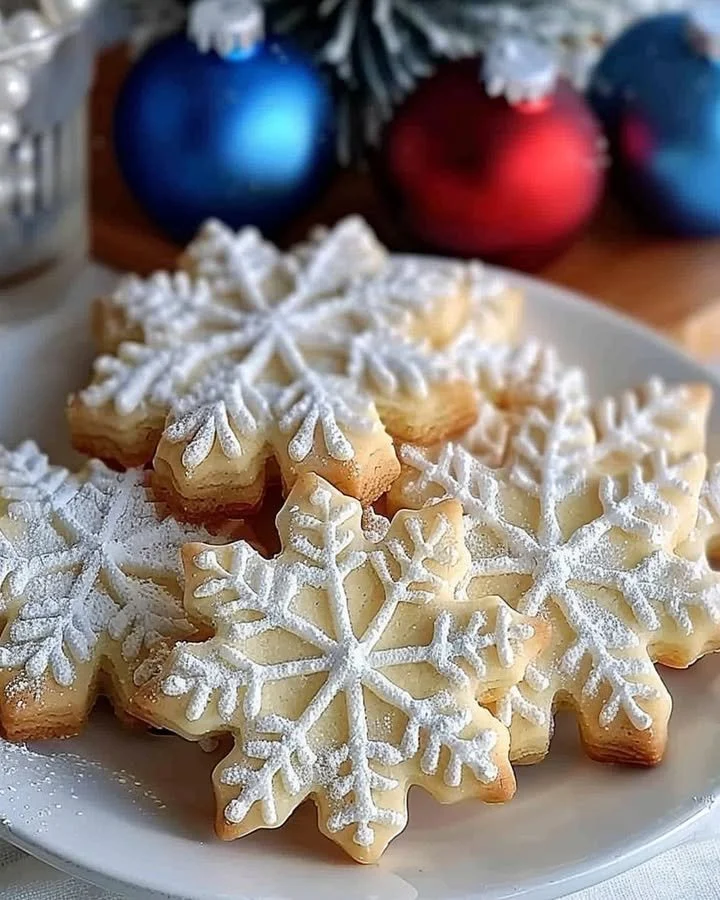
Snowflake Cookies
Snowflake Cookies are a delightful winter treat that embodies the spirit of the season! These charming, whimsical cookies are not only beautiful but also incredibly delicious. They evoke the imagery of delicate snowflakes falling softly to the ground, creating a perfect winter wonderland. With their buttery flavor, soft texture, and the sweet crunch of icing and sprinkles, these cookies are a favorite for any holiday gathering. This recipe breaks down the process into step-by-step instructions, ensuring you create a batch of stunning snowflake cookies that will impress your family and friends.
These cookies are perfect for decorating during the holiday season or for any cozy winter afternoon. Easy to make and loved by all, they bring joy and warmth to your home. Plus, you can engage the whole family in the decorating process, making it a memorable activity surrounded by laughter and creativity.
Why You’ll Love This Recipe
One of the standout features of Snowflake Cookies is how easy they are to prepare. With minimal ingredients, you can whip up a delightful batch without hours of fuss. This recipe is ideal for both seasoned bakers and beginners, offering a straightforward process that’s hard to mess up. Moreover, the whimsical shape and vibrant decorations will engage kids (and adults!) in the holiday spirit, making it a fun activity to share with family.
Additionally, Snowflake Cookies are versatile. You can customize them with various icing designs and colorful sprinkles that mimic the magic of snowflakes, ensuring each cookie is uniquely beautiful. This simple yet effective recipe allows you to focus not just on baking but also on creating wonderful memories around the kitchen counter.
Ingredients for Snowflake Cookies
To recreate these delightful Snowflake Cookies, you will need the following ingredients:
- 2 3/4 cups all-purpose flour: The base of your cookies, providing structure and a soft, tender crumb.
- 1 tsp baking soda: This leavening agent helps the cookies rise slightly for a light texture.
- 1 tsp salt: Enhances the flavor of the cookies and balances the sweetness.
- 1 cup unsalted butter (softened): The star of the show that adds richness and flavor.
- 1 cup sugar: Sweetens the cookies and contributes to the perfect melt-in-your-mouth texture.
- 1 egg: Adds moisture and binds the ingredients together.
- 1 tsp vanilla extract: For that delicious, aromatic flavor that warms the soul.
- 1-2 tbsp milk: Optional, to adjust the dough’s consistency.
- Icing sugar for decoration: Sweet and fluffy icing that creates a lovely finish.
- Sprinkles or edible glitter for snowflakes: To add that magical touch and visual appeal.
Step-by-Step Directions
Preheat Your Oven: Begin your baking adventure by preheating your oven to 350°F (175°C). The ideal temperature for achieving perfectly baked cookies!
Whisk Dry Ingredients: In a mixing bowl, whisk together the flour, baking soda, and salt. This step ensures that the dry ingredients are evenly mixed.
Cream Butter and Sugar: In a separate bowl, beat the softened butter and sugar together until the mixture turns light and fluffy. This should take about 2-3 minutes.
Add Egg and Vanilla: Mix in the egg and vanilla extract, blending until just combined for a rich flavor.
Combine Wet and Dry Ingredients: Gradually add the dry ingredients to the wet mixture. If the dough feels a bit dry, add 1-2 tablespoons of milk until you reach a workable consistency.
Refrigerate the Dough: Wrap the dough in plastic wrap and refrigerate for about 30 minutes. Chilling helps the cookies maintain their shape while baking.
Roll Out the Dough: On a floured surface, roll out the dough to about 1/4 inch thickness. This thickness is perfect for a chewy center and crispy edges.
Cut Out Cookies: Use a snowflake-shaped cookie cutter to cut out cookies from the rolled dough, placing them on a lined baking sheet.
Bake: Place the cookies in the oven and bake for 8-10 minutes. They’re done when the edges are golden brown but the centers should remain soft.
Cool and Decorate: Let the cookies cool on a wire rack before decorating them with icing and sprinkles.
Tips & Tricks
To ensure perfect Snowflake Cookies every time, here are a few chef secrets:
- Keep Your Butter Softened: Ensure your butter is perfectly softened, not melted, to achieve the desired texture.
- Don’t Skip Chilling: Chilling the dough is crucial for helping the cookies hold their shape during baking.
- Experiment with Flavors: Don’t hesitate to add citrus zest or other extracts for a unique twist on flavor.
- Use Royal Icing for Decoration: If you’re looking for a decorative finish, consider using royal icing for a more polished look.
- Try Different Shapes: While these cookies are themed, using other cookie cutters will allow you to create a variety of festive shapes.
Serving Suggestions & Pairings
Snowflake Cookies make a stunning centerpiece for holiday dessert tables. Serve them alongside a warm cup of cocoa, hot apple cider, or your favorite tea for a cozy pairing. For a fun twist, arrange them in a festive tin with other types of cookies, creating a lovely edible gift for friends or family.
Adding a drizzle of melted chocolate or a sprinkle of crushed peppermint can also elevate the flavor experience. Pair these cookies with vanilla ice cream for a cold treat that balances the warmth of fresh-baked cookies beautifully.
Nutritional Information
When indulging in Snowflake Cookies, it’s helpful to know their nutritional breakdown. Each cookie contains approximately 150 calories, with 7 grams of fat and 20 grams of carbohydrates. While they are a sweet indulgence, they can fit into a balanced diet when enjoyed in moderation. For those watching their sugar intake, consider reducing the amount of icing sugar used for decoration, or experimenting with sugar substitutes.
Storing Tips & Variations for Snowflake Cookies
To keep your Snowflake Cookies fresh, store them in an airtight container at room temperature. They can typically last up to a week without losing their delightful texture. For longer storage, you can freeze the unbaked cookie dough for up to three months. Just thaw in the refrigerator before rolling and cutting!
For those looking to lighten the recipe, consider using whole wheat flour for a healthier twist. You could also substitute some of the sugar with honey or other natural sweeteners, though keep in mind this may alter the final taste and texture.
Conclusion for Snowflake Cookies
Snowflake Cookies are a delightful treat that brings warmth and joy to any occasion. With their ethereal presence and deliciously buttery flavor, they’re sure to become a beloved family recipe. So why wait? Gather your ingredients and create your own batch of these charming cookies today! You won’t regret creating such a sweet memory with loved ones during the holiday season.
FAQs
1. Can I refrigerate the dough overnight?
Absolutely! Refrigerating the dough overnight is a great option. Just make sure it’s wrapped tightly to prevent it from drying out.
2. Can I use gluten-free flour?
Yes! You can substitute all-purpose flour with a 1:1 gluten-free flour blend. Always check the specific brand for the best results.
3. How do I make royal icing?
To make royal icing, beat 1 egg white (or use meringue powder) with 2 cups of powdered sugar until smooth and glossy. You can adjust the consistency with more sugar or water as needed.
4. Are these cookies suitable for gift-giving?
Definitely! Snowflake Cookies make a lovely gift when presented in a decorated tin or box. Just ensure they are well-separated with parchment paper to avoid sticking.
5. How can I make my cookies more festive?
Get creative with decorations! Use colored icing, festive sprinkles, edible glitter, or even decorative food markers to create unique and joyful designs on each cookie.
Snowflake Cookies
Ingredients
Method
- Preheat your oven to 350°F (175°C).
- In a mixing bowl, whisk together the flour, baking soda, and salt.
- In a separate bowl, beat the softened butter and sugar together until light and fluffy (about 2-3 minutes).
- Mix in the egg and vanilla extract until just combined.
- Gradually add the dry ingredients to the wet mixture, adding milk if the dough feels dry.
- Wrap the dough in plastic wrap and refrigerate for about 30 minutes.
- On a floured surface, roll out the dough to about 1/4 inch thickness.
- Use a snowflake-shaped cookie cutter to cut out cookies and place them on a lined baking sheet.
- Bake for 8-10 minutes or until edges are golden brown and centers remain soft.
- Let cookies cool on a wire rack before decorating.