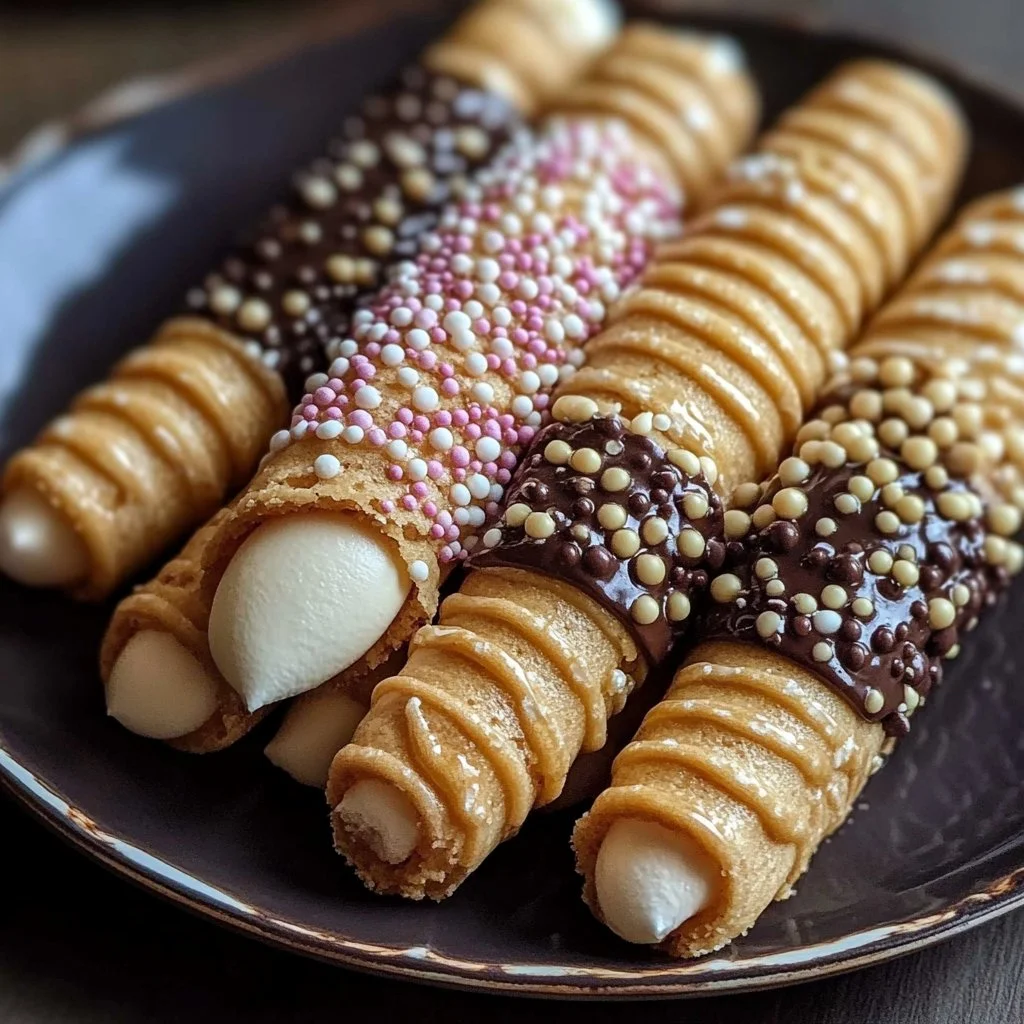
Wafer Pencil Cookies: A Sweet Treat You Can’t Resist
Imagine this: a crisp, delicate wafer cookie shaped like a pencil, drizzled in silky dark and creamy white chocolate. Each bite takes you to a blissful childhood moment spent in art class, surrounded by the vibrant colors of crayons and markers. These Wafer Pencil Cookies encapsulate not just an indulgence but a nostalgic journey that transports you back in time. They’re fun to make, delightful to look at, and absolutely delicious to eat—perfect for kids and adults alike. This treat, with its quick preparation time and simple ingredients, is bound to become a cherished favorite in your cookie repertoire.
Are You Ready to Unleash Your Inner Artist?
Picture this culinary scenario: you’re settling down for a movie night or a cozy afternoon with friends. You reach for a cookie, and as your teeth sink into the light, crispy wafer and rich chocolate layers, you can’t help but feel joy radiating through you. What if I told you these cookies can double as a fun activity for the kids, allowing everyone to unleash their creativity in the kitchen? Are you ready to create some sweet memories alongside these irresistible Wafer Pencil Cookies?
Why You’ll Love This Recipe
Here’s why these Wafer Pencil Cookies are a must-try:
Easy Prep: With just a few ingredients and simple steps, you’ll have these beauties whipped up in no time.
Crowd-Pleaser: These cookies are visually stunning and sure to impress with their intricate design.
Minimal Ingredients: You won’t need a whole pantry of items; just grab a handful of simple components and you’re set!
Kid-Friendly Fun: Get the little ones involved! They can help decorate and assemble, making for an unforgettable family bonding experience.
Nostalgic Twist: Each cookie reminisces your childhood love for crafts, offering a delightful trip down memory lane with every bite.
Ingredients
1 package (200g) of wafer sheets: Their delicate crunch brings a lovely contrast to the creamy chocolate.
200g dark chocolate: The rich, deep flavors of dark chocolate will coat these cookies beautifully, giving them a sophisticated touch.
100g white chocolate: Adding an elegant sweetness and creaminess, white chocolate is essential for those artistic “erasers.”
50g colored sprinkles or nonpareils: These cheerful decorations make your cookies vibrant and fun!
Edible silver balls or sugar pearls: These little gems add a luxurious finish, perfect for the ‘pencil lead’ effect.
100g unsalted butter: The base for our buttery buttercream that binds everything together.
100g powdered sugar: For the perfect sweetness that complements the rich chocolate.
Food coloring (optional): For those who want to get crafty with colored pencil cookies, a splash of color makes every bite a visual delight.
Timing
These cookies offer the best of both worlds—a quick prep time of just 30 minutes and a slightly longer waiting time as they set. In less than an hour, you can transform a handful of ingredients into an artistic masterpiece.
So, whether you are aiming for a fast and indulgent treat or want to savor the moment as they come to life, these cookies suit your timeline perfectly.
Step-by-Step
These delightful Wafer Pencil Cookies are simpler to make than you might think. Here’s how to bring them to life:
Melt the Dark Chocolate: Place the dark chocolate in a heatproof bowl over simmering water. Stir gently until melted and smooth, creating a silky coat for your cookies.
Melt the White Chocolate: In another bowl, repeat the process with the white chocolate. It’s essential to get this creamy layer just right for that elegant touch.
Cut Wafer Sheets: Carefully cut the wafer sheets into pencil shapes, about 15cm long and 1cm wide. These will form the body of your cookies, so make them as neat as possible.
Create Pencil Tips: Use small round pieces cut from another wafer sheet as pencil tips and set them aside. You’ll want them to mimic real pencil tips for that authentic look.
Dip for Lead: Take one end of the wafer strip and dip it into the melted dark chocolate. Allow the chocolate to set on a tray lined with parchment paper. This forms the ‘lead’ of your pencil cookie.
Make Buttercream: Beat the butter with powdered sugar until creamy and smooth. If desired, add food coloring to make your buttercream the color of choice for your ‘colored pencils.’
Assemble Your Cookies: Spread a thin layer of buttercream on each piece, leaving the chocolate-dipped tip bare.
Attach Tips: Gently stick the small wafer rounds at the tip using a bit of melted chocolate as "glue" to represent the pencil tip.
Coat with Buttercream: Optionally coat the rest of your pencil cookie with more colored buttercream.
Add the Eraser: Use a layer of white chocolate on the opposite end to represent an eraser.
Decorate to Delight: While the chocolate is still soft, sprinkle with colored sprinkles or attach edible silver balls for an eye-catching finish.
Set to Enjoy: Allow your Wafer Pencil Cookies to set completely before serving or packaging.
Throughout the process, let your imagination run wild! The ooey-gooey delights of chocolate, buttercream, and sprinkles will have your taste buds singing in harmony.
Nutritional Information
While indulging in these beautifully crafted cookies, you might be curious about their nutritional content. Each cookie has approximately 120 calories, making them a delightful occasional treat. Just remember, balance is key, and splurging every now and then is part of the fun!
Healthier Alternatives
For those who seek healthier options without compromising on taste, fear not!
Low-Sugar: You can substitute powdered sugar with a low-calorie sweetener. Choose one that measures up similarly to powdered sugar for best results.
Dairy-Free Swaps: Replace butter with a vegan alternative, and if you go for dairy-free chocolate, the enjoyment doesn’t have to stop!
Now you can enjoy your Wafer Pencil Cookies guilt-free while indulging your sweet tooth.
Serving Suggestions
Pair your Wafer Pencil Cookies with a scoop of vanilla or chocolate ice cream for an extraordinary dessert experience! They’re also fantastic for birthday parties, art-themed gatherings, or as a sweet addition to any holiday table.
Take these delightful cookies as a centerpiece, and watch how they bring joy to everyone around!
Common Mistakes
To ensure that your cookies turn out perfectly each time, avoid these common pitfalls:
Overbaking: If you leave your wafer cookies in the oven for too long, they can become overly crunchy and lose their delightful texture.
Texture Issues: Make sure to handle the melted chocolate gently for a smooth coating; grainy chocolate will ruin the aesthetics of your cookies.
Messes Galore: Getting a little messy is part of the fun, but a well-prepared work station can make a world of difference.
With these tips in mind, you’re set up for success!
Storing Tips
Keep your creativity flowing by storing your Wafer Pencil Cookies properly!
Freezing Portions: These cookies can be frozen for up to a month. Just place them in an airtight container with parchment paper in between layers.
Reheating Instructions: If you’ve frozen them and want to enjoy them warm, simply pull them out and let them thaw at room temperature. You can also pop them in the microwave for about 10 seconds to warm them up slightly.
Tempted to Bake These Wafer Pencil Cookies?
What are you waiting for? With their easy prep, artistic flair, and irresistibly indulgent taste, these Wafer Pencil Cookies are just begging to be made! Whether for a fun family project or to share with friends, these cookies will surely brighten your day.
Get your ingredients ready and bake your heart out—these delightful treats await!
FAQs
How long do these cookies last?
- They can be stored in an airtight container for about a week or frozen for up to a month.
Can I use milk chocolate instead of dark chocolate?
- Absolutely! Feel free to mix it up with your favorite chocolate.
Is it necessary to use food coloring?
- No, it’s optional! You can stick to classic colors or even go all-natural with colored sprinkles.
What’s the best way to serve these cookies?
- They taste delicious on their own or paired with ice cream for a truly indulgent experience.
Can I use different types of sprinkles for decoration?
- Yes! Get creative with your toppings. Use whatever edible decorations tickle your fancy!
Enjoy making these delightful Wafer Pencil Cookies, and may they fill your home with joy and sweetness!
Wafer Pencil Cookies
Ingredients
Method
- Melt the dark chocolate in a heatproof bowl over simmering water, stirring gently until smooth.
- Melt the white chocolate in another bowl using the same method.
- Cut the wafer sheets into pencil shapes, approximately 15cm long and 1cm wide.
- Create small round pieces from another wafer sheet to serve as pencil tips.
- Dip one end of each wafer strip into the melted dark chocolate and let them set on a lined tray.
- Beat the unsalted butter with powdered sugar until creamy, adding food coloring if desired.
- Spread buttercream on each wafer, leaving the chocolate-dipped tip bare.
- Attach the small wafer rounds at the tips using some melted chocolate.
- Optionally coat the rest of the pencil cookies with more colored buttercream.
- Use a layer of white chocolate at the opposite end to represent an eraser.
- Decorate with sprinkles or edible silver balls while the chocolate is still soft.
- Allow the cookies to set completely before serving.