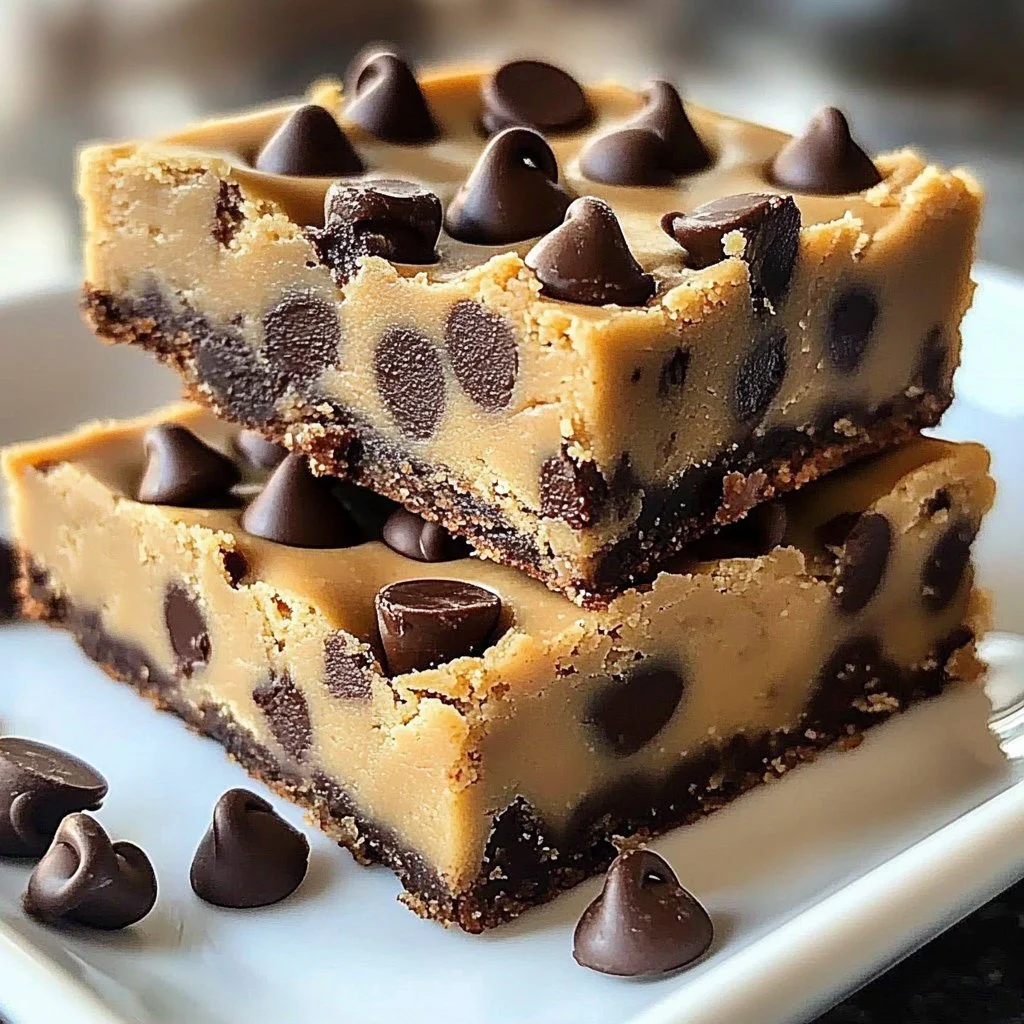
No Bake Chocolate Chip Cookie Dough Bars
If you’re craving a sweet indulgence that seamlessly blends nostalgia with decadence, look no further than these No Bake Chocolate Chip Cookie Dough Bars. Imagine biting into a rich, chewy layer of cookie dough studded with mini chocolate chips, all topped with a glossy layer of semi-sweet chocolate that melts in your mouth. This recipe is not only easy to prepare, but it also allows you to bypass the oven while still delivering that comforting taste of homemade cookies. Perfect for kids and adults alike, these bars are simple to make, ensuring you can whip them up quickly whenever the craving strikes.
Are you ready to indulge in nostalgia with a modern twist?
Do you remember the bliss of sneaking a spoonful of cookie dough while your mom baked? These bars capture that same delicious moment—except now, you don’t have to worry about raw eggs or baking at all! Just imagine these rich, gooey cookie dough bars satisfying that sweet tooth without any waiting.
Why You’ll Love This Recipe
These No Bake Chocolate Chip Cookie Dough Bars are a dessert lover’s dream come true, and here’s why:
Easy Prep: No oven required, making this a straightforward addition to your dessert repertoire.
Minimal Ingredients: With just a handful of ingredients, it’s an accessible treat for everyone, whether you’re a seasoned baker or just starting out.
Kid-Friendly: Engaging the little ones in this no-bake project will bring joy and laughter, and they’ll love devouring the results.
Crowd-Pleaser: Perfect for parties, potlucks, or a cozy night in, these bars cater to all chocolate and cookie dough lovers.
Ingredients
To create these delightful cookie dough bars, you’ll need:
- 1 cup unsalted butter, softened to room temperature
- 1 cup brown sugar, packed for that deep, molasses-like flavor
- 1/2 cup granulated sugar, adding sweetness that balances perfectly
- 1 teaspoon vanilla extract, for its warm and inviting aroma
- 2 cups all-purpose flour, giving structure to our gooey treat
- 1 cup mini chocolate chips, adding bursts of rich chocolate goodness
- 1/4 teaspoon salt, enhancing the flavors beautifully
- 1 cup semi-sweet chocolate chips (for topping), elevating the bars
- 2 tablespoons unsweetened cocoa powder (optional), for chocolate lovers
Feel how each ingredient plays a vital role as you envision mixing up a creamy, mouthwatering dough—the sweet aromas wafting through your kitchen will have you counting down the moments until you can take the first bite!
Timing
What’s better than a dessert that can be whipped up in less than 30 minutes? These bars are perfect for when you want a sweet treat fast—ideal for sudden cravings or unexpected guests. Plus, while they need some chill time in the fridge to set, that only builds anticipation for the indulgent experience awaiting you.
If you decide to add the cocoa powder, the chocolatey goodness will heighten your senses, but don’t worry if you want to keep it simple—these bars shine without it too!
Step-by-Step
In a large mixing bowl, beat the softened butter, brown sugar, and granulated sugar together until creamy and well combined. The sweetness will transform into a luscious, gooey mixture that’s hard to resist.
Add the vanilla extract and mix until thoroughly incorporated, the fragrant aroma wafting through your kitchen.
Gradually add in the flour and salt, mixing until a soft dough forms. Feel the texture change as the flour blends in, creating that classic cookie dough feel.
Stir in the mini chocolate chips, ensuring these little morsels are evenly distributed throughout the scrumptious dough.
Line an 8×8 inch baking dish with parchment paper or foil, leaving some overhang for easy removal. Press the cookie dough mixture evenly into the prepared dish, smoothing out the top with a spatula.
Melt the semi-sweet chocolate chips in a microwave-safe bowl in 30-second intervals, stirring in between until smooth. The transformation into a glossy chocolatey pool is nothing short of mesmerizing!
Pour the melted chocolate over the cookie dough layer and spread it evenly, creating a perfectly decadent topping.
Refrigerate for at least 1-2 hours or until the chocolate is set. The wait will be worth it, trust us!
Remove from the dish using the edges of the parchment paper, cut into bars, and serve.
These bars can be stored in an airtight container in the refrigerator for up to one week—if they last that long!
Each step fills your kitchen with the scents of indulgence and anticipation, creating a delightful experience that goes beyond mere cooking.
Nutritional Information
Calories per serving can vary based on portion sizes, but you can expect around 280 calories for each bar. While indulgent, this treat can still fit into an occasional guilty pleasure category, reminding you that life is too short to skip dessert!
Healthier Alternatives
Want to lighten the load a bit? Consider these low-sugar, dairy-free swaps:
- Substitute unsweetened applesauce for half the butter to create a moist, slight sweetness.
- Use coconut oil in place of butter for a dairy-free version.
- Swap granulated sugar and brown sugar for coconut sugar or a sugar substitute like Swerve for a lower-calorie option.
- Try almond flour instead of all-purpose flour for a gluten-free rendition.
These alternatives let you enjoy the magic of cookie dough bars without sacrificing your wellness goals.
Serving Suggestions
These No Bake Chocolate Chip Cookie Dough Bars are versatile enough for any occasion. They make a fantastic dessert at birthday parties, holiday gatherings, or casual backyard BBQs.
For a delicious spin, serve your bars with a scoop of vanilla ice cream or a dollop of whipped cream. Add fresh berries for a touch of tartness, creating a beautiful contrast of flavors that will leave guests raving about your impressively decadent dessert!
Common Mistakes
When making these bars, avoid common pitfalls, such as:
Overmixing the butter and sugars: Make sure you don’t beat in too much air; you want a dense and chewy texture.
Texture issues: If the dough feels too crumbly, make sure the butter is perfectly softened and not melted.
Messes: Using parchment paper helps with easy removal, but ensure your surface is clean to keep your kitchen tidy.
Storing Tips
To keep your bars fresh and delicious:
Store them in an airtight container in the refrigerator for up to one week.
If you want to prepare them ahead of time, consider freezing portions. Wrap individual bars tightly in plastic wrap and place them in a freezer-safe bag. They’ll stay fresh for up to three months.
When you’re ready to indulge, let them thaw at room temperature for a few minutes before enjoying.
Tempted to bake it ASAP?
These No Bake Chocolate Chip Cookie Dough Bars are not just a dessert—they’re an experience filled with delightful memories and sweet bliss. With minimal effort and maximum taste, you should seriously consider making a batch today. You’ll want to have them on hand whenever your sweet tooth calls!
FAQs
Can I add nuts?
Absolutely! Chopped walnuts or pecans would add a delicious crunch to your bars.Can I use gluten-free flour?
Yes! Use a 1:1 gluten-free flour blend for a delicious gluten-free treat.How long does it take for the chocolate to set in the fridge?
Chilling for at least 1-2 hours typically allows the chocolate to set perfectly.What if I don’t have mini chocolate chips?
You can use regular chocolate chips or chop a chocolate bar into small pieces!How do I make these vegan?
Substitute butter with coconut oil and use dairy-free chocolate chips, and you’re all set for a vegan version!
Embrace your inner dessert lover and treat yourself to the joy of No Bake Chocolate Chip Cookie Dough Bars—share them with friends, family, or keep them all to yourself!
No Bake Chocolate Chip Cookie Dough Bars
Ingredients
Method
- In a large mixing bowl, beat the softened butter, brown sugar, and granulated sugar together until creamy and well combined.
- Add the vanilla extract and mix until thoroughly incorporated.
- Gradually add in the flour and salt, mixing until a soft dough forms.
- Stir in the mini chocolate chips, ensuring they are evenly distributed.
- Line an 8x8 inch baking dish with parchment paper or foil, leaving some overhang for easy removal. Press the cookie dough mixture evenly into the prepared dish.
- Melt the semi-sweet chocolate chips in a microwave-safe bowl in 30-second intervals, stirring until smooth.
- Pour the melted chocolate over the cookie dough layer and spread it evenly.
- Refrigerate for at least 1-2 hours or until the chocolate is set.
- Remove from the dish using the edges of the parchment paper, cut into bars, and serve.