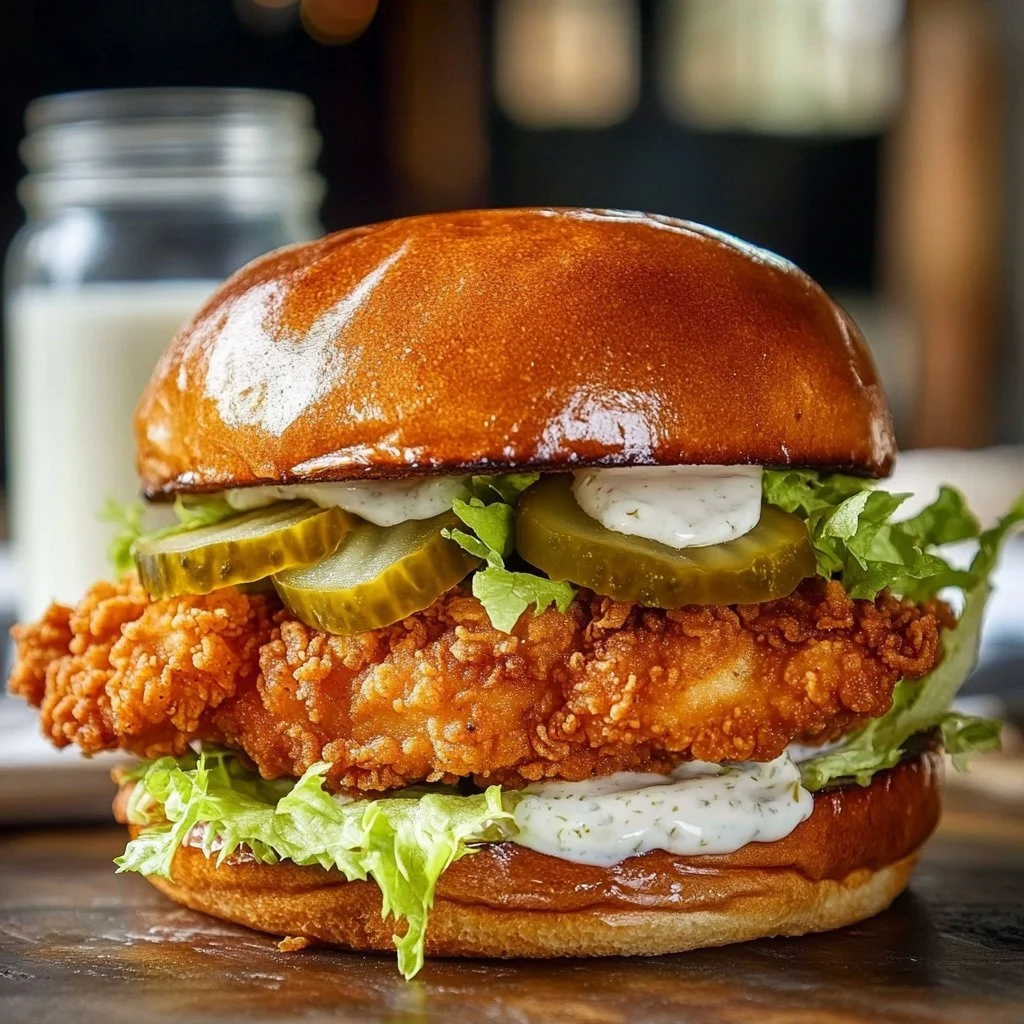
Crispy Dill Chicken Sandwich
The Crispy Dill Chicken Sandwich is a tantalizing treat that’s sure to elevate your lunch or dinner experience! This recipe bursts with flavor and texture, combining succulent fried chicken with a zesty dill aioli, all nestled between perfectly toasted brioche buns. Imagine biting into a sandwich where crunch meets creaminess, and the aromatic dill dances on your palate. It is a delightful dish that everyone in your family will crave, making it a worthy addition to your meal rotation. Get ready for a step-by-step adventure in the kitchen that results in a sandwich worth savoring!
Why You’ll Love This Recipe
You’ll be amazed at how easy it is to prepare this family-friendly dish that combines simplicity with deliciousness. The ingredient list is minimal, making shopping a breeze and prep time quick. This Crispy Dill Chicken Sandwich is perfect for a busy weeknight but also elegant enough to serve at gatherings or weekend brunches. You can have tender, crispy chicken ready in under 30 minutes, making this not just a meal, but an experience your loved ones will look forward to.
Ingredients for Crispy Dill Chicken Sandwich
- 2 large boneless, skinless chicken breasts: These are the stars of the dish, providing a juicy and tender bite.
- 1 cup buttermilk: Adds moisture and acts as a marinade to make the chicken tender.
- 2 tablespoons dill pickle juice: This tangy element infuses the chicken with a refreshing zing.
- 1 large egg: Helps in binding the coating to the chicken for that perfect crunch.
- 1 teaspoon salt and 1/2 teaspoon black pepper: Essential seasonings for flavor enhancement.
- 1/2 teaspoon garlic powder and 1/4 teaspoon paprika: Adds a delicious aroma and depth of flavor to the chicken.
- 2 cups all-purpose flour and 1/2 cup cornstarch: Creates a light and crispy coating.
- 1 tablespoon dried dill weed: Reinforces the dill flavor profile that makes this sandwich special.
- 1 teaspoon baking powder: Ensures that the batter remains light and airy.
- Vegetable oil (for frying): Essential for achieving the perfect fried chicken.
- 1 cup mayonnaise: A creamy base for the dill aioli.
- 2 tablespoons finely chopped fresh dill: More fresh dill for that aromatic kick!
- 1 tablespoon lemon juice and 1 clove garlic, minced: Brightens the flavor of the aioli.
- 1 teaspoon Dijon mustard: Adds a subtle tanginess for complexity.
- Salt and pepper to taste: For seasoning the aioli.
- 4 brioche buns, split: Soft and buttery, they make an excellent vessel for your sandwich.
- 4 slices cheddar cheese: Melts beautifully over the fried chicken.
- 1 cup shredded lettuce: Adds a fresh crunch.
- 1/2 cup dill pickle chips: A must-have for that signature dill flavor.
- 2 tablespoons butter, melted: For toasting the buns to golden perfection.
Step-by-Step Directions for Crispy Dill Chicken Sandwich
1. Marinate the Chicken
Start by marinating the chicken! In a medium bowl, whisk together the buttermilk, dill pickle juice, egg, salt, black pepper, garlic powder, and paprika. Once well-combined, add the chicken breasts, ensuring they’re well-coated. Cover the bowl and refrigerate for at least 2 hours, or for the best flavor, let them soak overnight.
2. Prepare Dredging Station
While your chicken marinates, prepare your dredging station. In a shallow dish, combine the all-purpose flour, cornstarch, dried dill weed, baking powder, salt, and pepper. This blend will create a delicious crispy coating for your chicken. Mixing these dry ingredients adds layers of flavor to your final dish.
3. Dredge the Chicken
After marinating, remove the chicken from the buttermilk mixture. Let any excess liquid drip off, then coat each piece in the flour mixture. For an extra crunch, you might choose to double-dredge the chicken by dipping it back into the buttermilk and then into the flour mixture a second time.
4. Heat the Oil
In a heavy-bottomed pot, heat vegetable oil over medium-high heat until it reaches 350°F (175°C). This hot oil will create a golden, crispy crust on your chicken but be careful and monitor the temperature to avoid any burning.
5. Fry the Chicken
Once the oil is hot, carefully add the chicken, frying for about 6-8 minutes per side, or until they are golden brown and cooked through (an internal temperature of 165°F or 74°C). Ensure not to crowd the pan, which can lower the temperature of the oil and affect the frying process.
6. Drain the Chicken
After frying, transfer the chicken onto a wire rack lined with paper towels. This will help absorb any excess oil and keep your crispy coating intact. Let them rest while you prepare the aioli and the buns.
7. Make the Dill Aioli
In a mixing bowl, combine the mayonnaise, chopped fresh dill, lemon juice, minced garlic, and Dijon mustard. Season with salt and pepper to taste. Stir until well-combined. For the best flavor, chill your aioli in the refrigerator until ready to use.
8. Toast the Buns
While the chicken cools and the aioli chills, prepare your brioche buns. Brush the cut sides with melted butter and toast them in a skillet over medium heat until golden brown. This adds flavor and prevents the buns from getting soggy once you’ve assembled the sandwich.
9. Assemble the Sandwich
Spread the prepared dill aioli generously on both halves of each brioche bun. On the bottom half, layer the lettuce, followed by the fried chicken, a slice of cheddar cheese, and dill pickle chips. Finally, place the top half of the bun on top.
10. Serve Immediately
Enjoy your culinary masterpiece right away! Pair your Crispy Dill Chicken Sandwich with a side of crispy fries or a light salad for a well-rounded meal.
Tips & Tricks
- To encourage crispiness, let the chicken marinate for longer. Overnight is the best for flavor absorption and tenderness.
- For an extra flavor boost, consider adding spices like cayenne or smoked paprika to the seasoning.
- If you want to skip frying, cook the chicken in an air fryer for a healthier, less oily option that still maintains crunch.
- Feel free to add toppings such as sliced tomatoes or avocado for added flavor and health benefits.
Serving Suggestions & Pairings
This Crispy Dill Chicken Sandwich is versatile and perfect for various occasions. Serve it alongside some golden fries for a comforting meal, or pair it with a fresh garden salad for a lighter option. For a delightful picnic, consider packing potato chips or a refreshing coleslaw. Add some ice-cold lemonade or iced tea to create the perfect outdoor gathering experience.
Nutritional Information
While enjoying the Crispy Dill Chicken Sandwich, be mindful of the balance between indulgence and nourishment. Typically, one sandwich is around 600-700 calories, depending on the amount of oil used during frying and the toppings chosen. Consider swapping out the mayonnaise for Greek yogurt in the aioli to cut calories while maintaining creaminess and tang.
Storing Tips & Variations for Crispy Dill Chicken Sandwich
Leftover chicken can be stored in an airtight container in the fridge for up to 3 days. When reheating, consider using an air fryer or oven to retain crispiness. If you’re looking for healthier swaps, you can bake the chicken instead of frying it or use whole wheat buns for added fiber. Creative variations can include using different sauces, like spicy sriracha mayo, or even making it a wrap with tortillas for a portable option.
Conclusion for Crispy Dill Chicken Sandwich
If you’re ready to tantalize your taste buds, the Crispy Dill Chicken Sandwich waits for your discovery! This recipe is not just a meal but a delightful experience that brings joy to any table. So don’t wait any longer—grab your ingredients and make this heavenly sandwich that everyone will rave about!
FAQs
1. Can I use chicken thighs instead of chicken breasts?
Yes, you can! Chicken thighs will provide even more flavor and juiciness to the sandwich. Just adjust the cooking time slightly.
2. Is there a gluten-free option for this recipe?
Absolutely! Substitute regular flour with a gluten-free flour blend, and ensure your cornstarch is also gluten-free.
3. Can I make the aioli in advance?
Yes, the dill aioli can be made 1-2 days in advance. Just keep it stored in the refrigerator in an airtight container.
4. How do I keep my chicken crispy after frying?
Place the fried chicken on a wire rack instead of a plate, allowing air circulation to prevent sogginess while cooling.
5. Can I make this sandwich spicier?
Certainly! You can add hot sauce to your aioli or incorporate some cayenne pepper into the flour mixture for an extra kick.

Crispy Dill Chicken Sandwich
Ingredients
Method
- In a medium bowl, whisk together buttermilk, dill pickle juice, egg, salt, black pepper, garlic powder, and paprika. Add chicken breasts, ensuring they are well-coated. Cover and refrigerate for at least 2 hours, or overnight for best flavor.
- In a shallow dish, combine flour, cornstarch, dried dill weed, baking powder, salt, and pepper.
- Remove chicken from buttermilk mixture. Let excess liquid drip off, then coat in the flour mixture. Optionally, double-dredge for extra crunch.
- Heat vegetable oil in a heavy-bottomed pot over medium-high heat until it reaches 350°F (175°C). Fry chicken for 6-8 minutes per side, or until golden brown and cooked through (internal temperature of 165°F or 74°C).
- Transfer fried chicken onto a wire rack lined with paper towels.
- In a mixing bowl, combine mayonnaise, chopped fresh dill, lemon juice, minced garlic, and Dijon mustard. Season with salt and pepper to taste. Chill until ready to use.
- Brush the cut sides of brioche buns with melted butter and toast in a skillet over medium heat until golden brown.
- Spread dill aioli on both halves of each bun. On the bottom half, layer shredded lettuce, fried chicken, cheddar cheese, and dill pickle chips. Place the top half of the bun on top.
- Serve immediately with crispy fries or light salad.